Apple Strudel

Pretty food just tastes better. This apple strudel recipe is both beautiful and delicious. It’s perfect for special occasions.

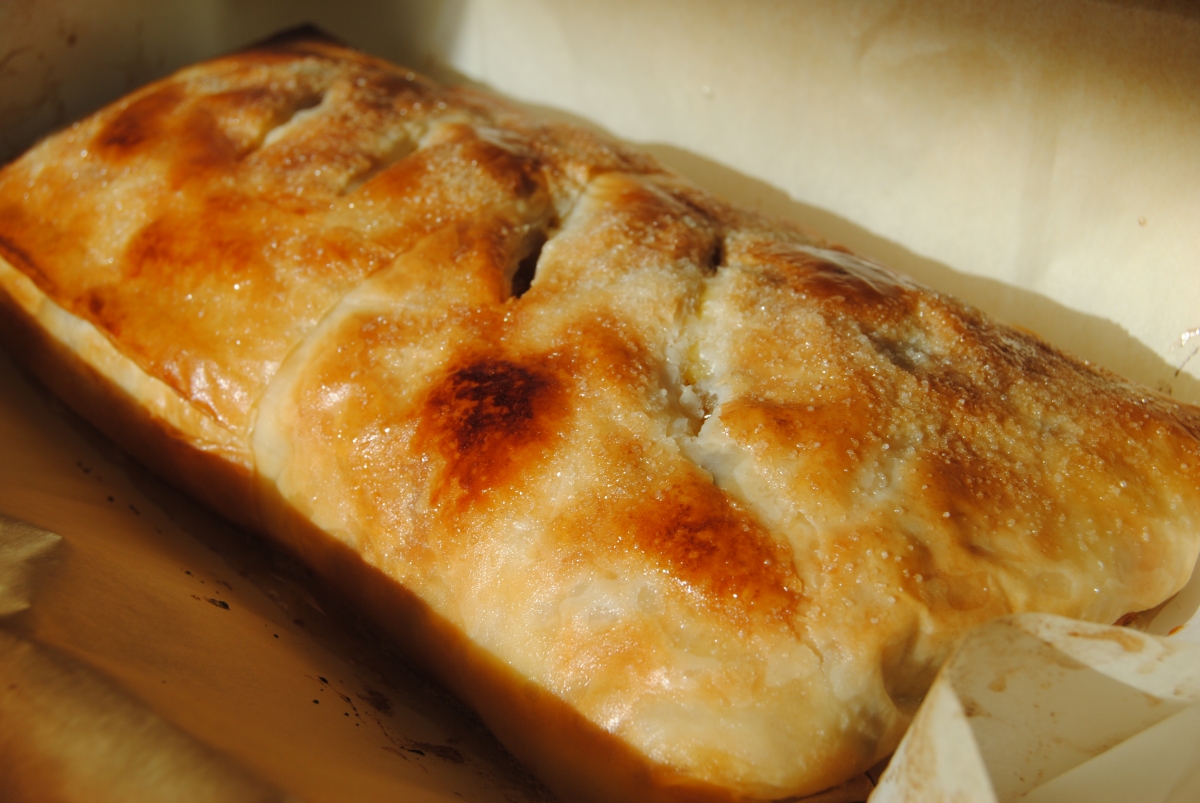
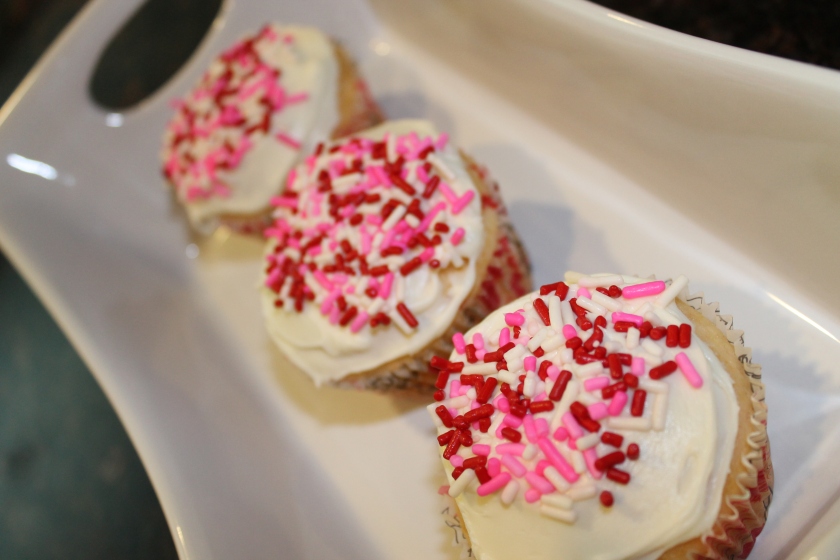
They say humility is a virtue, and I suppose that’s true.  When it comes to special occasions though… I admit… I do love to show off.  Pretty food just tastes better.  This recipe is both beautiful and delicious.  There’s nothing wrong with friends and family feeding your ego while you feed their bellies.

Phyllo dough is super complicated and time consuming to make from scratch. This is one of the few exceptions to my homemade is ALWAYS better rule.  The pre-made frozen phyllo dough from the store is just as good for this recipe and saves a ton of time.  It can, however, be frustrating to work with unless you follow these tips.

  1. Thaw in the fridge overnight, the night before.
  2. Keep the portion not being used covered with plastic wrap.  It dries out VERY quickly.
  3. Don’t sweat a couple tears in the dough, you’re going to use several layers.  Just try to alternate where the tears are so they’re not all in the same place causing a weak spot.
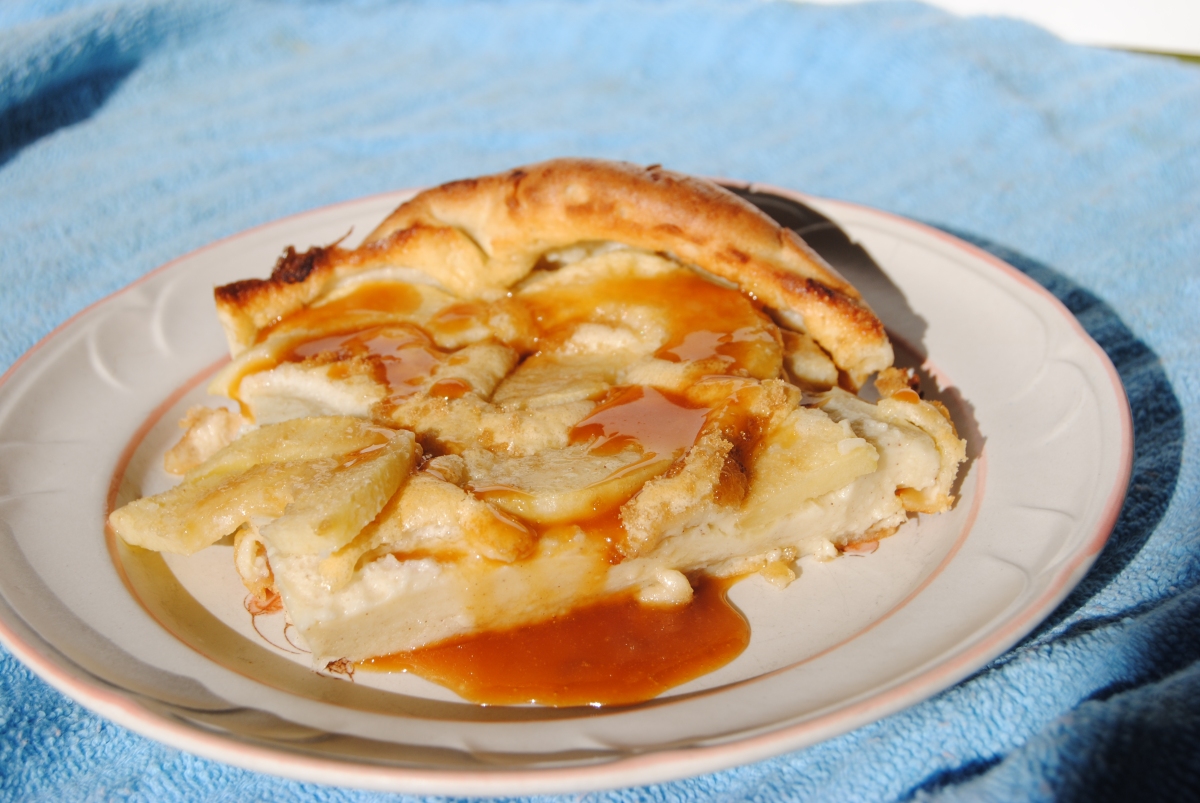
Apple Strudel

  • Servings: 8
  • Difficulty: Intermediate
  • Print

Try this recipe for an elegant end to a stay date this Valentine's day.

Ingredients

  • 1/2 cup golden raisins
  • 2 Tbsp Cognac
  • 1 stick butter
  • 1/4 cup bread crumbs (homemade is best)
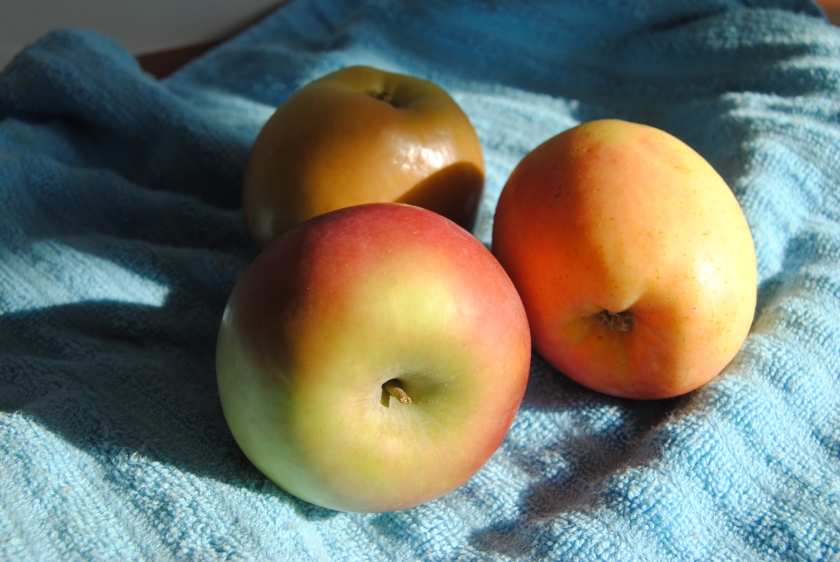
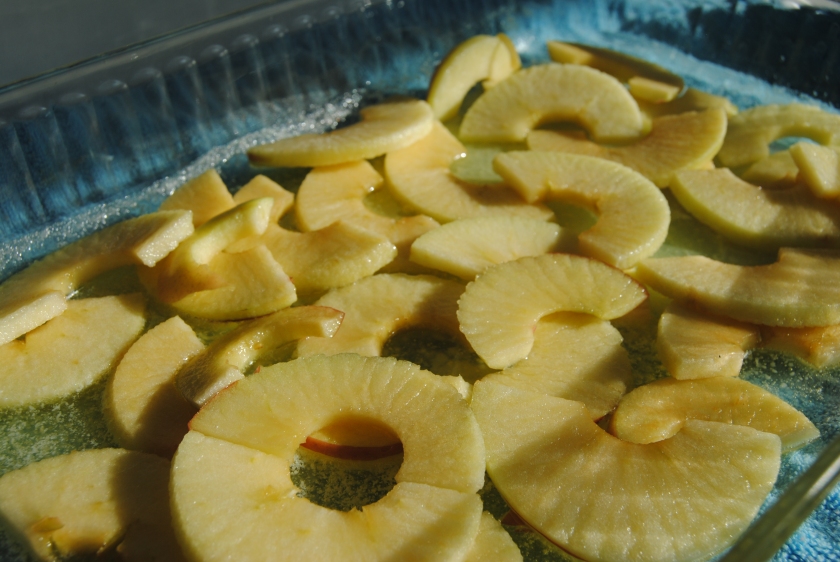
  • 1 lb Granny Smith apples, peeled, cored, and sliced 1/4 inch thick
  • 1 medium McIntosh apple, peeled, cores, and sliced 1/4 inch thick
  • 1/4 cup granulated sugar, plus extra for sprinkling
  • 1/4 tsp cinnamon
  • 1/8 tsp salt
  • 1 tsp fresh lemon juice
  • 10 sheets phyllo 14×9 inch
  • confectioner’s sugar for dusting (optional)

Directions

  1. Adjust oven rack to lower-middle position and heat oven to 475. Line a 9×13 baking sheet with parchment paper. Simmer raisins in Cognac in small saucepan over medium heat 1-2 minutes, until liquid is mostly absorbed.  Cover and set aside to cool.
  2. Combine 1 Tbsp butter and bread crumbs in a small skillet and toast over medium heat stirring often until golden brown.  Set aside to cool.
  3. In a large bowl, gently toss apples, raisins, breadcrumbs, 1/4 cup sugar, cinnamon, salt, and lemon juice.
  4. Melt remaining  butter.  Using a large sheet of parchment as a work surface, place 2 sheets of phyllo next to each other, overlapping by about 1 inch.  Brush entire surface lightly with melted butter and sprinkle with about 1/2 tsp sugar.  Repeat 4 more times so you have used all 10 sheets. You should have a rectangle about 14×16 inches, 5 layers thick, and 2 sheets wide (overlapping by 1 inch on each layer).
  5. Place filling near the bottom of the phyllo and slightly spread it out leaving 2 1/2 inch border on the bottom and 2 inch border on sides.  Fold the dough on the sides over the apples, then fold the bottom up over apples. Roll/fold the phyllo and apples up creating a rectangle package of apples wrapped up on phyllo.
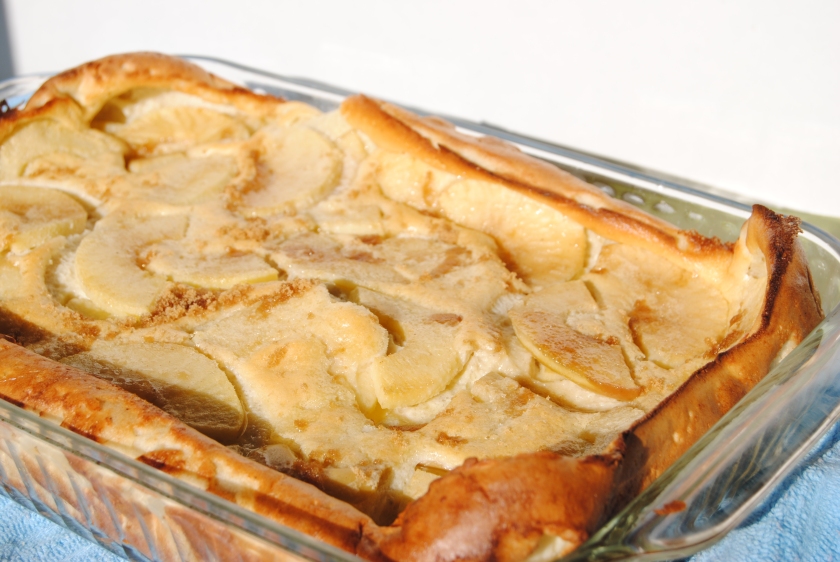
  6. Place strudel seam side down on prepared baking dish.  Once again, brush lightly with butter and sprinkle with 1 tsp sugar.  Cut 4, 2 inch crosswise slits to vent in top of strudel.
  7. Bake 15 minutes.  Cool about 30 minutes.  Dust with confectioners sugar. This is best served warm with plenty of fresh whipped cream.

Don’t over sweeten the whipped cream if you make your own (which you should) so the tartness of the apples can come through.

I know I’m not the only one who shows off for special occasions.  What’s your best showpiece recipe?

Ahh, Mom’s Chicken Noodle Soup

My mom’s homemade chicken noodle soup is the best. That is all. It’s like a delicious bowl of warm blanket that wraps you up with every bite.

My mom’s homemade chicken noodle soup is the best.  That is all.  It’s like a delicious bowl of warm blanket that wraps you up with every bite.  I can still remember the first time I had canned chicken noodle soup.  I was at the babysitters house.  She put this bowl of stuff in front of me and said lunch is ready.  I asked what it was.  “It’s chicken noodle soup.” she said with a smile, thinking she had given me something warm and delicious.  I was polite and ate it.  It was OK, I thought, but that stuff is NOT chicken noodle soup.  Chicken noodle soup, as I knew it, was full of flavor with big chunks of chicken, potatoes, and carrots, delicious homemade broth, and… wait for it… homemade noodles.

dsc_0157


Mom's Chicken Noodle Soup Recipe

  • Servings: 8-10
  • Difficulty: Intermediate
  • Print

This chicken noodle soup recipe is how my mom used to make it with a few tweaks of my own. It's so basic. It does take some time to do it right, but it's so worth the wait. It's perfect for cold days or when your sick. It makes a lot, but that's ok. It's even better second day.

Ingredients

  • 1 whole chicken
  • 1 small onion roughly chopped
  • 2 bay leaves
  • 2 carrots peeled and chopped
  • 2 medium russet potatoes chopped (I like to leave the peels on)
  • 1 Fennel bulb sliced 1/4 inch thick
  • 1 large parsnip peeled and chopped
  • 1 tsp thyme
  • 1/2 tsp oregano
  • salt and pepper to taste
  • 1 recipe homemade egg noodles (you can substitute egg noodles from the store, but they’re REALLY not as good)

Directions

  1. Place chicken in a large stock pot and fill with enough water to cover by about 2 inches along with the onion, bay leaves, and plenty of salt and pepper. Bring to a boil then reduce heat to a simmer. Simmer for 1 1/2 – 2 hours.
  2. Place chicken on a plate to cool slightly.
  3. Strain broth and place in fridge for an hour or so to bring fat to the top. You can skip this step, but it allows you to skim the fat off which I prefer.
  4. Return broth (sans fat) to the pot along with the carrots, potatoes, fennel, parsnip, and spices and bring to a boil on high heat.
  5. Once it begins to boil, lower the heat to maintain a low boil until the veggies are tender, about 15-20 minutes.
  6. Add chicken and noodles and boil another 10-15 minutes.

Enjoy with Delicious Crusty Beer Bread. Do you have a recipe for food that’s more comforting than this? If so, please share.

Easy Valentine’s Day Cupcakes

Winter is upon us we are knee deep in the white stuff. No kidding… knee deep. So what do you do with kids on snow day #17?
You make easy Valentine’s Day cupcakes of course!

Winter is upon us we are knee deep in the white stuff. No kidding… knee deep.

So what do you do with kids once you have gotten to snow day number 17? They can lay in the snow, make snowmen, go sledding, and have snowball fights. But this year it isn’t just the snow. It is also the cold. When it is -10 degrees outside you can’t send the kids out to play. So when the cold happens what do you do? Why you bake of course!

Easy Valentine's Day Cupcakes

  • Servings: 24
  • Difficulty: Easy
  • Print

An easy and delicious activity to keep the kids busy on a snowy winter day.

Vanilla Cupcakes

Ingredients

  • 1 cup white sugar
  • 1 egg
  • 1 teaspoon pure vanilla
  • 1 cup milk
  • ½ cup butter, room temp
  • ½ tea salt
  • 1 ½ cups flour

Directions

  1. Preheat oven to 350 degrees.
  2. Cream together shortening and sugar until it is creamy all the way through.
  3. Add in the egg and vanilla, beating until light and fluffy.
  4. Combine the flour, baking powder, and salt in a separate bowl.
  5. Take turns adding the dry mixture and milk into the creamy mixture – 1/4th at a time.
  6. When everything is fully incorporated scoop into lined cupcake molds.
  7. Bake for 15-18 minutes or until a toothpick comes out clean.
  8. Cool completely before frosting.

Frosting

Ingredients

  • ½ tea pure vanilla
  • 4 tablespoons butter, room temperature
  • 2 cups confectioners’ sugar
  • 2 tablespoons milk

Directions

  1. Cream all ingredients together until fluffy.
  2. Frost and enjoy!

February 2014 021

My girls made these from start to finish this time but we all had a great time eating them. We pair them with a cup of hot chocolate after playing in the snow.

Enjoy!

Strawberry Cake

This is the easiest cake to make… ever. You can even assign it to one of the kids. Try it the next time your MIL shows up unannounced.

Delicious Strawberry Cake

Takes 1 hour, Serves 8 people.

Ingredients

  • 1 egg
  • 1 tea pure vanilla
  • 1 cup milk
  • ½ cup butter, soft
  • ½ tea salt
  • 1 ½ cups flour (we use wheat flour)
  • 1/2 cup frozen strawberries; thawed and blended

Directions

  • Preheat oven to 350 degrees.
  • Cream together shortening and sugar. Add in the egg and vanilla, beating until light and fluffy. Combine the flour, baking powder, and salt in a separate bowl. Take turns adding the dry mixture and milk into the creamy mixture. Stir in the thawed frozen blended strawberries.
  • Bake for 30 to 40 minutes in preheated oven or until a toothpick comes out clean. You need to watch your cake. Every oven is different and will cook at various speeds. This particular cake came out a little darker than I would have liked but I think the strawberries that I added might have something to do with that.
  • Cool completely.
  • Once the cake was cooled completely I put it into a container that was lined in aluminium foil. The next step is to take a dowel or a sturdy skewer and poke holes all over your cake. I actually have a cooking dowel and I used that. So the holes in my cake might look larger than in your cake. I then went though and poked a few smaller holes with a large serving fork. I liked the end result.

img_4651

  • Next mix a packet of strawberry Jello with 1 cup boiling water until dissolved. Once the powder is dissolved add 1/2 cup cold water and mix. Pour all of the mixture slowly and evenly over the cake. It might not look like it is getting in the holes, but it is. Next place the cake into the refrigerator for an hour or longer. Mine set in there for about 2 hours.

img_4653

  • All you have left to do is frost the cake. Oh wait! Don’t use frosting. Whip up a little whipping cream and frost it with that! It is light and airy and delicious. I think that this cake would be strange with regular frosting, frosting is too think and dense. I also added some pink, white, and yellow sprinkle balls just to add color. Remember to refrigerate the leftovers. This one was gone in less than 2 days so I really don’t know how long it should last. As a rule at my house everything is thrown out in 2-3 days if not consumed.

img_4675

This cake is just about the easiest cake. The best thing about it – no frosting! I hate frosting. I always have to scrape it off of my cupcakes/cake at parties without people seeing me.


Superbowl Food vs. New Years Weight Loss Goals: Skinny Boneless Chicken Wings

With the Superbowl right around the corner, do you need a game plan for avoiding all those fatty, albeit delicious, finger foods at the party?

So you’ve set your new year’s resolutions.  You’ve written them down, made some changes, things are going well.  If  you’re like 90% of the rest of us, weight loss is on the top of the resolution list.  If you are among that 90%, at this point you’ve probably gotten a gym membership (if you’re still looking around, check out our Get Fit in 2017 guide.)  You’ve probably also made it to the health food store for some protein powder, vitamins, and  other “when you’re in a hurry” essentials.  Well done!  You’re off to a great start. And so am I.

Watch out for hurdles. Party food can really sabotage a low fat, low calorie diet plan. With the Superbowl right around the corner I need a game plan for avoiding all those fatty, albeit delicious, finger foods at the party.

dsc_0889

I simply can’t turn down chicken wings. If they’re at the party, I’m going to eat them. My strategy is to bring my own chicken wings that have been altered to be not just low fat but nutritious and still delicious. Their oven baked instead of deep fried and I’ve replaced the white flour breading with wheat germ which gives them into a nice dose of folic acid. There are a lot of foods that do not translate well from fattening to nutritious. This is not one of them. I was actually surprised at how yummy these turned out.

Skinny Boneless Chicken Wings

  • 4 large boneless skinless chicken breasts
  • ½ cup low-fat milk
  • 3 eggs
  • 1 tsp water
  • ¾ cup wheat germ flakes
  • ½ cup freshly grated Parmesan
  • Salt and pepper
  • Frank’s Red Hot Sauce

Preheat oven to 350 degrees. Cut each chicken breast into 3 evenly sized pieces. Place milk and a small shallow bowl. Beat eggs and water in another bowl until slightly foamy. In another Bowl combine wheat germ cheese and salt and pepper to taste. Dip each piece of chicken individually in milk, then we term mixture, then eggs, and then wheat germ mixture a second time. Place on a lightly greased cookie sheets. Repeat with all the pieces of chicken. Lightly spray each piece of chicken with cooking spray. (Olive oil spray us best)

dsc_0849

Bake for 20 minutes turning over halfway through cooking time. until the chicken reaches an internal temperature of 170 degrees. Sprinkle them with Frank’s Red Hot Sauce to taste.  I love spice so I tend to use a lot of Frank’s.

dsc_0878

Serve with light blue cheese salad dressing. I always use Lighthouse brand. It’s delicious.

Low Carb Spaghetti Squash Spaghetti

Abs are made in the kitchen, not the gym. Pasta is usually a huge “no, no” for weight loss, but this recipe puts a new twist on an old favorite

It’s that time of year again when we all take inventory of the things in our lives that need a bit of tweaking, pursuing, and accomplishing.  For many of us weight loss has made the new year resolution list for too many years to count.  This year… You got this!

Abs are made in the kitchen, not the gym.  Pasta is usually a huge “no, no” for weight loss, but this recipe puts a new twist on an old favorite that adds flavor, nutrition, and most importantly, cuts carbs.  If you’re a big gardener and still have spaghetti squash from last fall, this is a great way to use it up while giving a boost to your new years weight loss goals.

Spaghetti Squash Spaghetti

Start the sauce first,

Sauce

  • 3 tbsp olive oil
  • 1 onion chopped
  • 2 grated carrots
  • 1 lb lean ground beef or turkey
  • 2 or 3 cloves garlic minced
  • 2 tsp beef bouillon (for vegetarian just leave this out)
  • 3 lbs fresh tomatoes scalded, peeled, and roughly chopped
  • 1 cup chopped fresh basil
  • plenty of fresh Parmesan  cheese

Heat oil in a large  pot.  Saute onion, carrot, and meat if using until onion is translucent and meat is cooked through.  Add garlic and saute for about 2 minutes, until fragrant. Add bouillon and stir to combine. Add tomatoes, salt and pepper to taste.  Bring to a simmer and cook for about 2 hours, until thickened.

Prepare the Squash

OLYMPUS DIGITAL CAMERA

About an hour before the sauce is done heat the oven to 350°.  Pierce the spaghetti squash (about 1-1 1⁄2 lbs) 3 or 4 times and bake it on a cookie sheet for about 45 min to 1 hour, until fairly soft when poked with a knife.

When the squash is done, cut it in half and scoop out the seeds.  Then scoop the meat/noodles into a ovenproof dish.  Stir in some sauce, the basil, and Parmesan cheese.  Put it back into the oven for another 15-20 min.  Baking it again helps the noodles absorb some of the sauce.  You can eat it like this, or cover it with a little bonus topping.

Bonus topping

spaghetti-with-spaghetti-squash

Chop up any delicious veggies you have in your fridge.  For this one I used asparagus, mushrooms, and zucchini.  You could also use cauliflower, Brussels sprouts, egg plant, really… anything.  Saute them for about 3 or 4 minutes in some olive oil and a clove or two of minced garlic.

Give each plate a little bonus topping, some more fresh basil, and Parmesan cheese.  Enjoy!


p.s.
Try this bonus topping on all kinds of stuff.  It’s great on everything from eggs to meatloaf.

p.s.s  Don’t tell your kids you’re having squash for dinner.  Just add a little extra cheese to theirs.  They’ll never know the difference.

Puffy Apple Pancakes

This is my favorite breakfast or brunch recipe to make for house guests. It fills the house with the most homey delicious scent.

When the weather starts to turn cold, I tend to migrate to the kitchen ( even more than i normally do). I think it’s a multi sensory thing. The taste, the smell, and the sight. It’s all so comforting when it’s chilly outside. This is my favorite breakfast or brunch recipe to make for house guests. It fills the house with the most homey delicious scent. When you pull it out of the oven it is gorgeous. Have your guests seated when it’s done baking, it does fall rather quickly. And the taste, oh the taste! Yum!

dsc_0625

WARNING! I made these for my cousin and her husband when they were staying with us a few years ago. Then I had to make them again every morning that they stayed because he loved them so much. I even had to make two batches on the last morning because one just wasn’t enough. I really wonder how many times my cousin has made these since then. I’m guessing at least 300.

Puffy Apple Pancakes

  • 6 eggs
  • 1 1\2 cup milk
  • 1 cup flour
  • 2 Tbsp sugar
  • 1 tsp vanilla
  • 1\2 tsp salt
  • 1\4 tsp cinnamon
  • 6 Tbsp butter
  • 2 apples, peeled and thinly sliced
  • 2 Tbsp brown sugar
  1. Oven to 425. Place the butter in a 9x 13 pan to melt the butter while the oven is Heating. When it’s melted put the apple slices on a flat layer in the pan too lightly toast them. Do not let them burn.    dsc_0627
  2. In a blender mix eggs, milk, flour, sugar, vanilla, and salt, until blended. If using an electric mixer, better will remain slightly lumpy.
  3. Remove pan from oven and immediately poor batter over apples. Sprinkle with brown sugar. Bake in center of oven 20 minutes or until puffed and brown. Serve immediately.

dsc_0647

These are amazing with homemade buttermilk syrup.  It tastes like eating a caramel apple for breakfast.

Chocolate Mug Brownie-Cake

I don’t believe in eating dessert everyday but my father and grandfather do. I grew up with my grandpa telling me, “Eat dessert first. There is always room for pie. A piece of cake would be okay right now.”

I do believe in eating something sweet almost everyday. That might be fruit, a piece of chocolate, Jell-O, or frozen grapes. I believe if you deny yourself too much you will binge and eat too many treats and deserts at once. My girls wanted a really quick and easy treat the other night but I was too tired to make something “real” so I showed them how to make their own mug cakes.

Chocolate Mug Brownie-Cake

IMG_5471

As we all know I don’t like messes but I figure if I never show the kids how to cook then they are going to be mad at me when they become adults and don’t know the difference between a whisk and a sifter. I let them each make their own mug cake. I call it a Mug Brownie-Cake because it is moist like a brownie but has the consistency of a cake. It is easy enough for them to make themselves, and fast enough that it can be made, cleaned up, and eaten in 10 -15 minutes. This is basically a small version of a large cake that I make.

Ingredients:

  • ¼ cup all-purpose flour
  • 1.5 tbsp. unsweetened cocoa powder (one of my girls wanted even less because she said this was too much chocolate (as if that exists) so I gave her 1 tbsp.)
  • ¼ tsp. baking powder
  • 1.5 tbsp. granulated sugar (or sugar substitute)
  • ⅛ tsp. salt
  • ¼ cup + 1 tbsp. milk (we used vanilla almond milk)
  • 2 tbsp. vegetable oil
  • 1 tbsp. hazelnut chocolate spread (optional, but not optional for me)
  • Sliced strawberries
  • Whipped cream

Directions:

  • In a bowl, mix all of the dry ingredients

corn maze

  • Whisk in the milk & vegetable oil until all ingredients are combined and batter is smooth with no clumps
  • Pour the batter into a microwave-safe mug. You want to use a large enough mug so that there is space for the cake to rise without overflowing
  • Add 1 tbsp. of Nutella into the middle of the cup. Just spoon it in the middle of the batter, it will sink into the batter

IMG_5462

  • Place your cup onto a paper plate in the microwave to keep the microwave clean
  • Microwave for 80 to 90 seconds
  • Let stand for 3-5 minutes as it will be VERY hot
  • Top with whip cream and strawberries (optional)

IMG_5471

As you can see from my photo the Nutella does not cook so there will be a creamy center. These were so easy for my girls to make. Now they can make them even if I am working or too busy to make a “real” cake.

IMG_5468

Brownie + Cookie = Brookie

Do you like brownies? Do you like cookies? If you said yes, then you will LOVE this quick and easy Chocolate Chip Brookie. I have been making these for years and my family can never get enough of them. I usually make a double batch and use a 9 x 13 baking dish, and even then they are all gone within 24 hours. When you have 2 teenage boys, 2 tween girls, and a husband treats like this tend go really fast!

Chocolate Chip Brookie

IMG_4796

Brownie Base

Ingredients

  • 3/4 cup oil
  • 1 1/2 cups sugar (we use a sugar substitute)
  • 1 1/2 tsp pure vanilla extract
  • 3 eggs
  • 3/4 cup flour (we use wheat)
  • 1/3 cup + 2 tbsp cocoa
  • 3/8 tsp baking powder
  • 1/4 tsp salt

Directions

  • Preheat oven to 325 degrees
  • Grease a 9 x 9 baking pan
  • Mix oil, sugar and vanilla with a spoon (not a mixer)
  • Add eggs, one at a time and incorporate each one until combined
  • Mix flour, baking powder, salt and cocoa in a different bowl
  • Add the dry mix to the egg mixing with spoon until combined
  • Pour the batter into the pan and spread evenly

IMG_4784

Chocolate Chip Cookie Mix

Ingredients

  • 3/4 cup sugar (we use a sugar substitute)
  •  3/4 cup packed brown sugar (we use a sugar substitute)
  • 1  tea pure vanilla extract
  • 1 egg
  • 2 1/4 cup flour (we use wheat)
  • 1 cup butter, softened
  • 1 tsp baking soda
  • 1/2 tsp salt
  • 1 package (12 ounces) chocolate chips

Directions

  • Using a spoon mix the sugars, butter, vanilla and egg in a large bowl.
  • Stir in flour, baking soda and salt
  • Add chocolate chips.

IMG_4786

  • Using a tablespoon scoop cookie dough onto the top of the brownie mix. Scoops should be 2 inches apart covering the brownie mix. Some will slightly sink into the brownie mix and that is okay.
  • Bake at 325 for 30 minutes. WATCH THE OVEN! Every oven heats at a different temp and can take a different amount of time. I usually start testing my Brookies at 25 minutes and then every 2 to 3 minutes after that until a toothpick inserted about 2 inches from the edge of the pan comes out almost clean. You do not want to over cook these!

IMG_4788

My husband likes his finished product a little too warm with vanilla ice cream melting on top. Enjoy!

IMG_4796

Wordless Wednesday: Cache Valley Food Tour

We went to Cache Valley for a foodie blogging tour, and we were pleasantly surprised at have our taste buds tickled and eyes dazzled. We had no idea how much fun we could have spending a day there.